Access Point Instructions for Proxim Wireless
This page explains the configuration of Proxim ORiNOCO™ access points for external Captive Portal and RADIUS server authentication.
IronWiFi Console Configuration
- Log into the IronWiFi console or register for free
- Create a new network
- After that, create a new captive portal, with vendor Proxim
Access Point Configuration
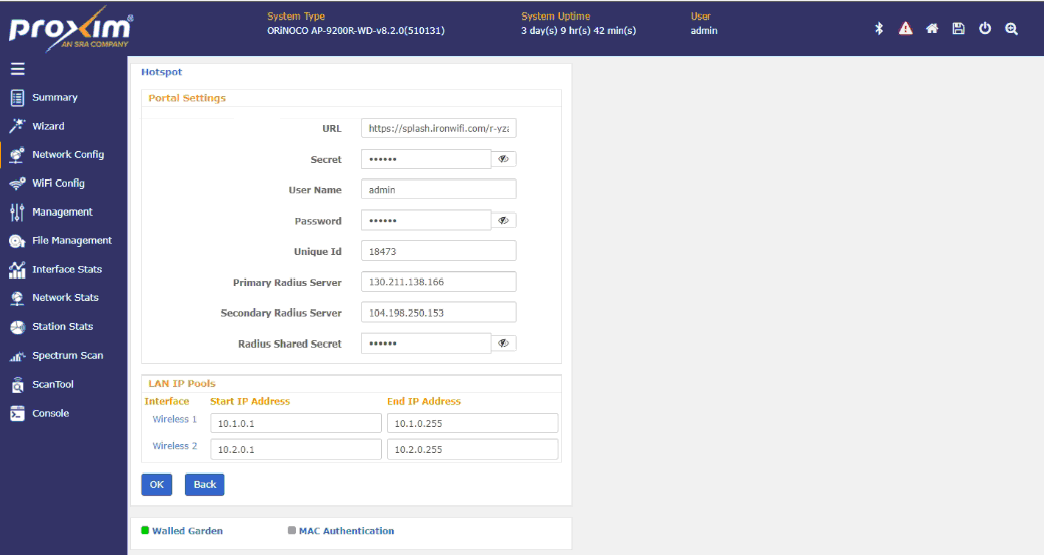
- Configure the following parameters for hotspot configuration on Proxim Wireless devices:
- Hotspot status - Specifies the status of the hotspot
- Session Timeout - Specifies the time interval after which the session will end automatically.
- Portal URL - get this value from the IronWiFi console
- Portal Secret - get this value from the IronWiFi console
- User Name/User Password - Applicable only when using an external portal service provider.
- Unique ID/Port ID - Applicable only when using an external portal service provider. This information will be auto-populated or provided by an external portal service provider.
- Primary Radius Server - get this value from the IronWiFi console
- Secondary Radius Server - get this value from the IronWiFi console
- Radius Shared Secret - get this value from the IronWiFi console
To configure the hotspot using Web GUI, navigate to Network Configuration > Hotspot for Admin users and Advanced Configuration > Network > Hotspot for Advanced users.
Note: - Authentication between client and the device is always open - DNS should be reachable whenever Web Portal or RADIUS Servers or both are configured using Domain Names. - When the Web Portal or RADIUS Servers or both are unreachable, users cannot access the Internet..
-
When Hotspot 1.0 is enabled, Proxim Access Point operates in Routing Mode with NAT (Network Address Translation) enabled.
-
A DHCP Server is automatically enabled on the LAN interfaces and assigns IP addresses dynamically to the clients connecting to the Access Point. If required, the default IP pools of the DHCP Server can be changed by the Hotspot Operator.
Note: - The first IP address from the DHCP pool is assigned to the LAN interface(s). - Using the Web GUI, configure the DHCP Pool from Network > Hotspot.
- Click Add in the Hotspot screen, the Hotspot Walled Garden Table - Add Row screen appears. Configure the Domain Name i.e. the list of site names to attain direct access.
To configure, add URL(s) or web address (es). For Example: If you add proxim.com in the list, you can access any sites like proxim.com, www.support.proxim.com, etc. directly without being redirected to the login page.
Note: Access to any other site would require the user to login into the portal
Click OK and COMMIT, to save the configured parameters. REBOOT the device, if you have changed any of the parameters marked with an asterisk symbol.
! You must also install a valid SSL certificate on your controller/AP, in order to avoid authentication issues !