In this guide we describe how to configure your Cisco WLC controller to work with Passpoint profiles, OpenRoaming and SIM card authentication
Prerequisites
- Access to the Cisco WLC Dashboard as a user with administrative privileges.
- Cisco access points and wireless LAN controller are deployed.
- Controller has basic networking configured and has the licenses required.
- Access points are connected to the controller and are online.
- Information about the assigned RADIUS servers (Server IP address, port numbers, shared secrets):
- Email or document that contains this information
OR - Access to the IronWiFi Management Console - Sign in or Open Account
- Email or document that contains this information
Creating your network / SSID
This document will guide you in configuring a Hotspot 2.0 (Passpoint) SSID in Cisco WLC.
1. To start the configuration process, log in to the Cisco wireless LAN controller as admin. For existing environments with additional users, log in as a user with administrative privileges.
2. Click Advanced on the top right of the Dashboard.
3. Click WLANs. The WLANs menu appears on the left side of the Dashboard.
4. Select Create New on the top right, then click Go.
The WLANs>New page appears.
5. For the new WLAN set Type to ‘WLAN’. Enter the Profile Name such as "IronWiFi_Passpoint"


6. Enter the SSID, as "IronWiFi ".
7. For ID you may choose any value from the select menu.
8. Click Apply on the top right to save your changes.
The wireless LAN you added appears on the WLANs information page.
9. Click Save Configuration on the top right to commit the configuration.
10. Still on the WLANs information page, click the WLAN ID, such as “2”.
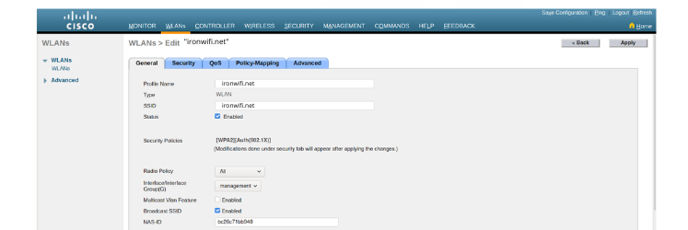
The WLANs > Edit page appears.
11. In General tab,
- set SSID ‘Status’ to ‘Enabled’
- set ‘Broadcast SSID’ to ‘Enabled’
- set NAS-ID value to MAC address of your access point connected to WLC controller.
12. Then click on the Security tab.
- set Layer 2 Security as ‘WPA+WPA2’,
- enable WPA2 Policy
- set WPA2 Encryption to AES.
- Under ‘Authentication Key Management’ section enable ‘802.1X’ option
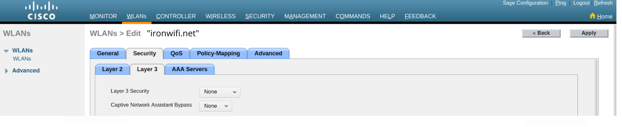
14. After, click on the Layer 3 tab. In the Layer 3 tab:
- set Layer 3 Security to ‘None’.
- set Captive Network Assistant Bypass to ‘None’.
15. Click on AAA Servers tab:
- Enable both Authentication and Accounting servers and set the following values as RADIUS servers:
RADIUS Primary IP Address: from the Console
RADIUS Secondary IP Address: from the Console
Shared Secret: from the Console - Enable Interim Updates and set Interim Interval to 180 seconds.
- Click Apply on the top right to save your changes.
16. Click Save Configuration on the top right to commit the configuration.

Update the 802.11u settings
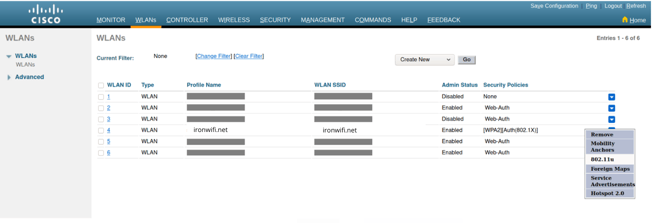
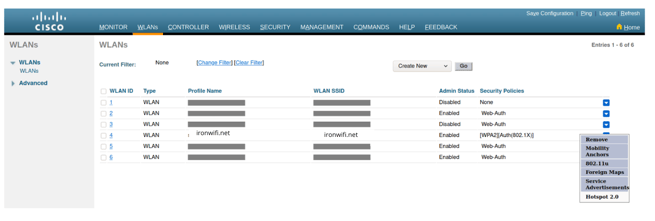
- Go again to the WLANs section. Locate the wireless LAN you created and mouse over
to the right of the wireless LAN description. Select 802.11u from the drop-down menu.
The 802.11u Parameters page appears. - Set “802.11u Status” to Enabled. The 802.11u information page refreshes with properties to set.
- Set “Internet Access” to Enabled.
- In the Realm List, enter domain ironwifi.net. Click Add. The Realm appears in the Realm Index.
To enable OpenRoaming functionality, add also these domains -
- apple.openroaming.net
- google.openroaming.net
- openroaming.org
- ciscooneid.openroaming.net
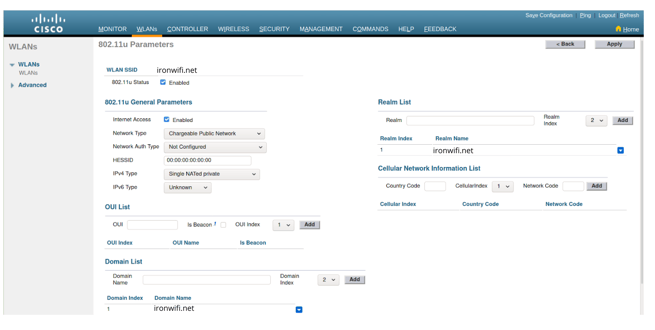
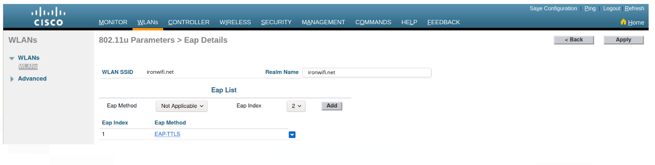
- Click on the Realm Name you just created in the Realm Index. The 802.11u Parameters>EAP Details information page appears.
- Set EAP Method to “EAP-TTLS”, then click on “Add”. The EAP method appears in the EAP Index.
- Click Apply on the top right to save your changes.
Configure Hotspot 2.0
- Go again to the WLANs section. Locate the wireless LAN you created and mouse over
- Select Hotspot 2.0 from the drop-down menu.
The WLAN > Hotspot 2.0 information page appears.
3. Set “Hotspot2 Enable” as Enabled;
Please be sure to set values for WAN Metrics -- without these values set, Android devices are less likely to stay connected.
-
-
- WAN Link Status- UP
- WAN Downlink Speed
- WAN Uplink Speed 99
- WAN Uplink load 99
-
Load Measurement duration 10
4. Enter your Operator Name, under the Operator Name List.
Add your Language Code and click Add.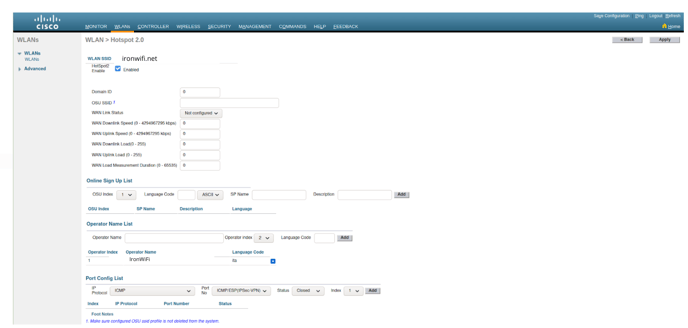

5. Click Apply on the top right to save your changes.

7. Your SSID is now configured. In a few minutes after you have applied the last changes, your WLAN will have Hotspot 2.0 capabilities.