In this guide we describe how to configure your Aruba wireless LAN controller to work with Passpoint profiles, OpenRoaming and SIM card authentication
Prerequisites
-
This user guide applies to Aruba Mobility Controllers with AOS 8.x or later.
AOS 6.4.x is the minimum version to support Passpoint capabilities.
- Access to the Aruba wireless LAN controller as a user with administrative privileges.
- Information about the assigned RADIUS servers (Server IP address, port numbers, shared secrets):
- Email or document that contains this information
OR - Access to the IronWiFi Management Console - Sign in or Open Account
- Email or document that contains this information
Log in to the Aruba wireless LAN controller
To start the configuration process, log in to the Aruba wireless controller dashboard as admin. For existing environments with additional users, log in as a user with administrative privileges.
The Aruba Dashboard appears.

Note: There are a number of options to set. Only the options that require your input are shown. Default values are used for options that don’t need adjustment.
Configure Hotspot 2.0
Hotspot 2.0 allows mobile devices to join a WiFi network automatically, including during roaming, when the devices enter the Hotspot 2.0 area.
Define ANQP profiles
Access Network Query Protocol (ANQP) provides a range of information, such as IP address type and availability, and roaming partners accessible through a hotspot.
Note: Because the process for defining ANQP profiles is the same for all ANQP profiles, detailed screen captures are shown only for the first ANQP profile definition.
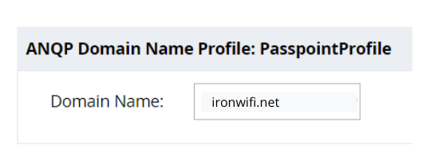
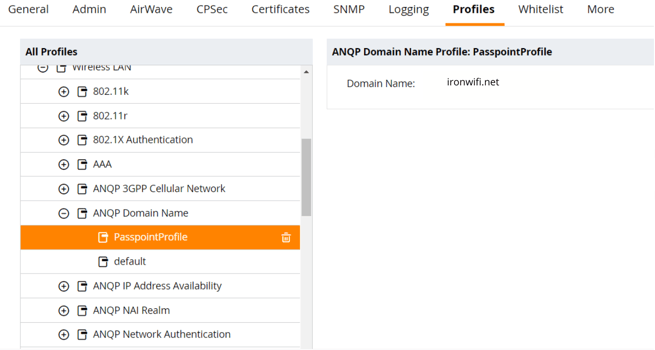
ANQP Domain Name Profile
The ANQP Domain Name Profile identifies the hotspot operator domain name.
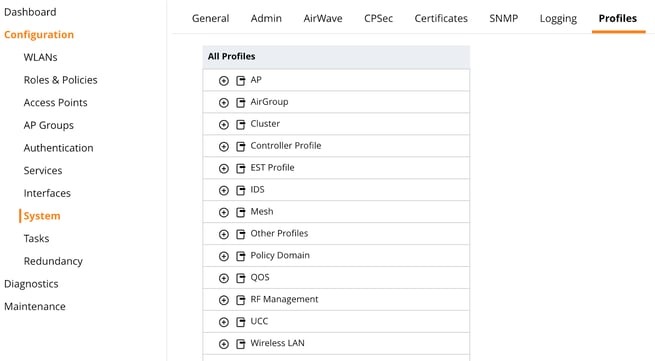
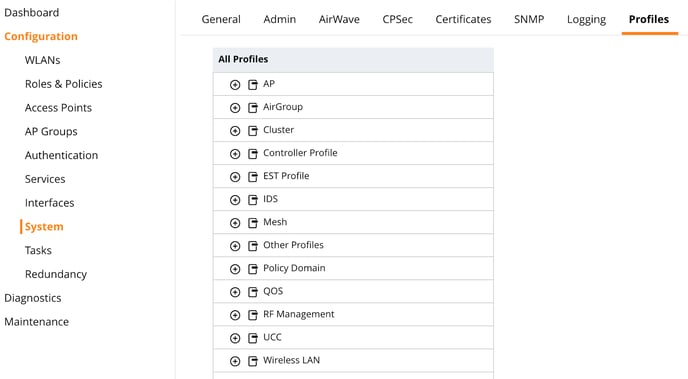
- Select Configuration and then System from the menu on the left side of the Aruba Dashboard.
- Select the Profiles tab on the top right of the dashboard. A list of all profiles appears.
- Select Wireless LAN from the Profiles list.
- Under Wireless LAN, select ANQP Domain Name. On the right side of the page, an area appears where you’ll define the profile.
- Click + next to ANQP Domain Name Profile to add the profile. Text boxes appear.
- Enter the Profile Name and Domain Name into the text boxes, such as “PasspointProfile” and the domain provided in the Passpoint setting page of your IronWiFi dashboard - ironwifi.net.
- Click Submit on the bottom right. This saves and loads the configuration.
- Click Pending Changes on the top right.
The Pending Changes dialog box appears.


The completed profile should look similar to this image.
Note: A completed profile shows a “Submit As” selection next to “Cancel” and “Submit”. You only use “Submit As” if you’re changing an existing configuration.
ANQP NAI Realm Profile
The NAI Realm Profile describes the Network Access Identifier (NAI) values and the method used for authentication. The values you enter here are reflected in the Generic Advertisement Service (GAS) Response frame.
- Select Configuration and then System from the menu on the left side of the Aruba Dashboard.
- Select the Profiles tab on the top right of the dashboard. A list of all profiles appears.
- Select Wireless LAN from the Profiles list.
- Under Wireless LAN, select ANQP NAI Realm. On the right side of the page, an area appears where you’ll define the profile.
- Click + next to ANQP NAI Realm Profile to add the profile. Text boxes appear.
- Enter the Profile Name and NAI Realm Name into the text boxes, such as “IronWiFi_Realm_Profile” and “*.ironwifi.net”.
- For NAI Realm Encoding, take the default value (uses a UTF-8 formatted character string).
- (Optional) Click the checkbox next to NAI Home Realm to specify this as the Home Realm.
- Select eap-ttls for NAI Realm EAP Method 1. The ANQP NAI Realm Authentication Param 1 information box appears.
- Click + at the bottom left of the ANQP NAI Realm Authentication Param 1 box.
The Add New dialog box appears. - For ID, select credential-type. For Value, select cred-cert.
- Click again + at the bottom left of the ANQP NAI Realm Authentication Param 1 box. The Add New dialog box appears.
For ID select non-eap-inner-auth. For Value, select non-eap-mschapv2 - Click again + at the bottom left of the ANQP NAI Realm Authentication Param 1 box. The Add New dialog box appears.
For ID select expanded-inner-e… For Value, select eap-method-ttls - Click OK.
- Click Submit on the bottom right. This saves and loads the configuration.
- Click Pending Changes on the top right. The Pending Changes dialog box appears.
- Click Deploy Changes to commit the configuration.
The completed profile should look similar to this image.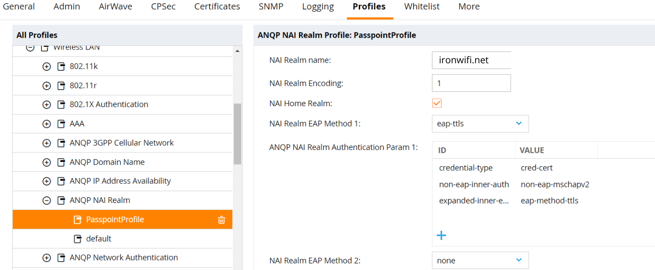

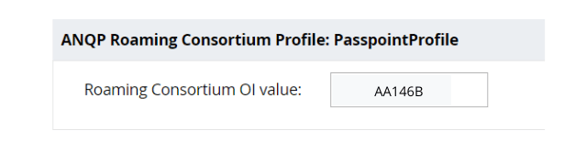
ANQP Roaming Consortium Profile
The Roaming Consortium Profile defines the service provider identity in beacons and probe responses to clients.
- Select Configuration and then System from the menu on the left side of the Aruba Dashboard.
- Select the Profiles tab on the top right of the dashboard. A list of all profiles appears.
- Select Wireless LAN from the Profiles list.
- Under Wireless LAN, select ANQP Roaming Consortium. On the right side of the page, an area appears where you’ll define the profile.
- Click + next to ANQP Roaming Consortium Profile to add the profile. Text boxes appear.
- Enter the Profile Name, such as “PasspointProfile”.
- Enter "AA146B" for the Roaming Consortium OI Value.
- Click Submit on the bottom right. This saves and loads the configuration.
- Click Pending Changes on the top right. The Pending Changes dialog box appears.
- Click Deploy Changes to commit the configuration.
The completed profile should look similar to this image.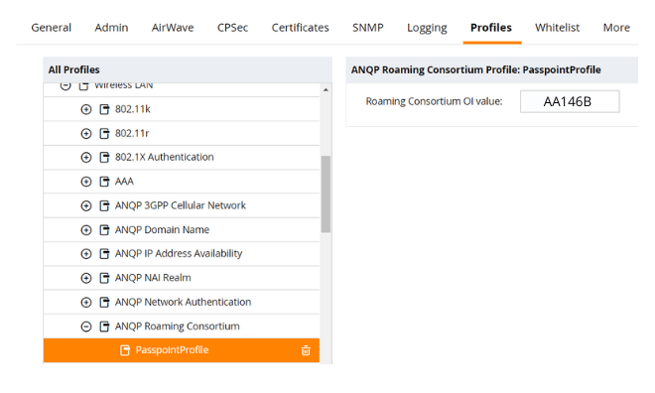
ANQP Venue Name Profile
The ANQP Venue Name Profile defines information elements for venue group and venue type, with a provision for a valid venue URL. The venue name is a unique identifier for each business site. For example, if your business is a coffee shop with 3 locations, each location is a specific site.
- Select Configuration and then System from the menu on the left side of the Aruba Dashboard.
- Select the Profiles tab on the top right of the dashboard. A list of all profiles appears.
- Select Wireless LAN from the Profiles list.
- Under Wireless LAN, select ANQP Venue Name. On the right side of the page, an area appears where you’ll define the profile.
- Click + next to ANQP Venue Name Profile to add the profile. Text boxes appear.
- Enter the Profile Name into the text box, such as “PasspointProfile”.
- Select an appropriate Venue Group and Venue Type. (They default to “unspecified”.)
- Enter the Venue Name, such as "TestArubaVenue".
- Click Submit on the bottom right. This saves and loads the configuration.
- Click Pending Changes on the top right. The Pending Changes dialog box appears.
- Click Deploy Changes to commit the configuration.
The completed profile should look similar to this image.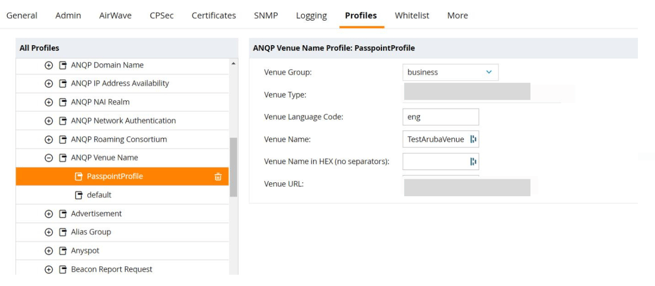
H2QP WAN Metrics
The ANQP Venue Name Profile defines a Hotspot 2.0 Query Protocol (H2QP) profile that specifies the hotspot WAN status and link metrics. The values under this category indicate the WAN Link capacity, speed and status.
1. Select Configuration and then System from the menu on the left side of the Aruba Dashboard.2. Select the Profiles tab on the top right of the dashboard. A list of all profiles appears.
3. Select Wireless LAN from the Profiles list.
4. Under Wireless LAN, select H2QP WAN Metrics. On the right side of the page, an area appears where you’ll define the profile.
5. Click + next to H2QP WAN Metrics to add the profile. Text boxes appear.
6. Enter the Profile Name into the text box, such as “PasspointProfile”.
7. Select the “link_up” option for the H2QP WAN metrics link status. (They default to “reserved”.)
8. Check the box next to H2QP WAN metrics symmetric WAN link if the site has a WAN link with symmetric speed in both the uplink and downlink directions. (Optional)
9. Note: DO NOT check the option H2QP WAN metrics link at capacity since this indicates that the WAN Link has reached its maximum capacity. If this parameter is enabled, no additional mobile devices will be permitted to associate to the hotspot.
10. Select values consistent with the WAN link capacity for WAN Metrics uplink speed: (0 - 2,147,483,647 Kbps). This indicates the current WAN backhaul uplink speed in Kbps. If no value is set, this parameter will show a default value of 0 to indicate that the uplink speed is unknown or unspecified. E.g. 10000
11. Select values consistent with the WAN link capacity for WAN Metrics downlink speed: (0 - 2,147,483,647 Kbps). This indicates the current WAN backhaul downlink speed in Kbps. If no value is set, this parameter will show a default value of 0 to indicate that the downlink speed is unknown or unspecified. E.g. 10000
12. Select values consistent with the WAN link capacity for WAN Metrics uplink load: (1-100) this indicates the percentage of the WAN uplink that is currently utilized. If no value is set, this parameter will show a default value of 0 to indicate that the downlink speed is unknown or unspecified.
13. Select values consistent with the WAN link capacity for WAN Metrics downlink load: (1-100) this configures the percentage of the WAN downlink that is currently utilized. If no value is set, this parameter will show a default value of 0 to indicate that the downlink speed is unknown or unspecified.
14. Click Submit on the bottom right. This saves and loads the configuration.
15. Click Pending Changes on the top right. The Pending Changes dialog box appears.
16. Click Deploy Changes to commit the configuration.
The completed profile should look similar to this image.

Configure the Advertisement Profile
You assign the ANQP profiles you defined to an Advertisement Profile. The Advertisement Profile collects ANQP profiles into an entity that the Hotspot 2.0 wireless LAN can broadcast (advertise).
Create the Advertisement Profile
- Select Configuration and then System from the menu on the left side of the Aruba Dashboard.
- Select the Profiles tab on the top right of the dashboard. A list of all profiles appears.
- Select Wireless LAN from the Profiles list.
- Under Wireless LAN, select Advertisement. On the right side of the page, an area appears where you’ll define the profile.
- Click + next to Advertisement Profile to add the profile. Text boxes appear.
- Enter the Profile Name, such as “Aruba Passpoint”.
- Click Submit on the bottom right. This saves and loads the configuration.
- Click Pending Changes on the top right.
The Pending Changes dialog box appears.


Assign ANQP profiles to the Advertisement Profile
Assign (link) the ANQP profiles you defined previously to the Advertisement Profile.
- From the Aruba Dashboard, select Configuration > System > Wireless LAN > Advertisement > IronWiFi_AdvProfile > ANQP Domain Name. The ANQP Domain Name Profile information box appears.
- Click + at the bottom left of the ANQP Domain Name Profile information box.
The Add New dialog box appears. - Select the ANQP Domain Name Profile you defined.
- Click OK.
- Click Submit on the bottom right. This saves and loads the configuration.
- Click Pending Changes on the top right. The Pending Changes dialog box appears.
- Click Deploy Changes to commit the configuration.

ANQP NAI Realm
ANQP Roaming Consortium
ANQP Venue Name
H2QP WAN Metrics
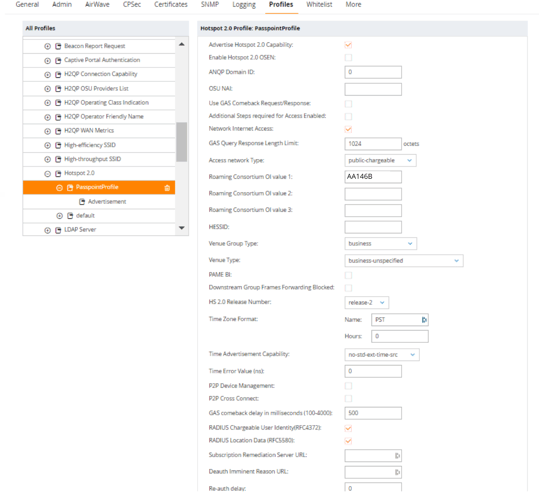
Configure the Hotspot 2.0 Profile
You create a Hotspot 2.0 Profile and assign (link) the Advertisement Profile to it.
Create the Hotspot 2.0 Profile
- Select Configuration and then System from the menu on the left side of the Aruba Dashboard.
- Select the Profiles tab on the top right of the dashboard. A list of all profiles appears.
- Select Wireless LAN from the Profiles list.
- Under Wireless LAN, select Hotspot 2.0. On the right side of the page, an area appears where you’ll define the profile.
- Click + next to Hotspot 2.0 Profile to add the profile. Text boxes appear.
- Complete this information for the Hotspot 2.0 profile.
Profile name—Enter an appropriate profile name, such as “PasspointProfile”.
Advertise Hotspot 2.0 Capability—Click the checkbox.
Access network Type—Select an appropriate option, such as “public-chargeable”.
Roaming Consortium OI value 1—Enter "AA146B".
Venue Group Type—Select an appropriate option, such as “business”.
Venue Type—Select an appropriate option, such as “business-professional-office”.
RADIUS Chargeable User Identity(RFC4372):—Click the checkbox.
RADIUS Location Data (RFC5580)—Click the checkbox. - Click Submit on the bottom right. This saves and loads the configuration.
- Click Pending Changes on the top right.
The Pending Changes dialog box appears.


The completed profile should look similar to this image.
Assign the Advertisement Profile to the Hotspot 2.0 Profile
Assign (link) the Advertisement Profile you defined previously to the Hotspot 2.0 Profile.
- From the Aruba Dashboard, select Configuration > System > Wireless LAN > Hotspot 2.0 > IronWiFi_HS > Advertisement. The Advertisement Profile: PasspointProfile information box appears.
- Select the Advertisement Profile you defined.
- Click Submit on the bottom right. This saves and loads the configuration.
- Click Pending Changes on the top right. The Pending Changes dialog box appears.
- Click Deploy Changes to commit the configuration.

Set up a secure RADIUS connection
Configure Authentication Servers
We recommend you create both the primary RADIUS authentication server and the secondary RADIUS authentication server. Then you’ll create a server group for them.
Add RADIUS authentication servers
- Select Configuration and then Authentication from the menu on the left side of the Aruba Dashboard.
- Select the Auth Servers tab on the top left of the dashboard. A list of RADIUS authentication servers appears, including servers and server groups.

- Click + at the bottom left of the All Servers information box. The New Server dialog box appears.
- Enter the server Name, such as “Primary Radius”.
- Enter the IP address/hostname of the RADIUS: from the Console
- Take the default server Type of RADIUS.
.png?width=554&height=563&name=35.189.111.2%20(3).png)
- Click Submit. The RADIUS server you added appears in the All Servers list.
- Double click the server you added to specify its properties. A list of Server Options appears.
-
Complete this information for the RADIUS server.
Auth port—Take the default of auth port from the Console.
Acc port—Take the default of acct port from the Console.
Shared key—Enter the RADIUS server secret from the Console
Retype key—Re-enter the RADIUS server from the Console
NAS ID—Enter a valid site identifier for your venue. IronWiFi uses the RADIUS NAS ID to identify your venue (a site location) with each RADIUS access request.
Station ID type—(Optional) Choose a valid Station ID type. - Click Submit on the bottom right. This saves and loads the configuration.
- Click Pending Changes on the top right.
The Pending Changes dialog box appears.
13. Repeat steps 1-11 to add the secondary RADIUS servers, such as “Secondary Radius”, using the IP address from the Console
You have to submit and deploy changes for each RADIUS server
Aggregate the RADIUS servers into a server group
You can create groups of servers for specific types of authentication.
- From the Aruba Dashboard, select Configuration > System > Configuration > Authentication > Auth Servers. A list of RADIUS authentication servers appears, including servers and server groups.
- Click + at the bottom left of the Server Groups information box.
.png?width=655&height=321&name=35.189.111.2%20(4).png)
The Add Server Group dialog box appears. - Enter the server Name, such as “IronWiFi Radius Group”.
- Click Submit.
- Select the newly created server group in the Server Groups list.
- Click + at the bottom left of the Server Groups information box to add a server to the server group. The New Server for <servergroupname> dialog box appears.
- Select a server to add to the server group.
- Click Submit.
The RADIUS server you selected appears in the list of servers for the server group.
Configure the 802.1X Authentication Profile
- Select Configuration and then Authentication from the menu on the left side of the Aruba Dashboard.
- Select the L2 Authentication tab on the top middle of the dashboard. Then select 802.1X Authentication.
On the right side of the page, an area appears where you’ll define the profile.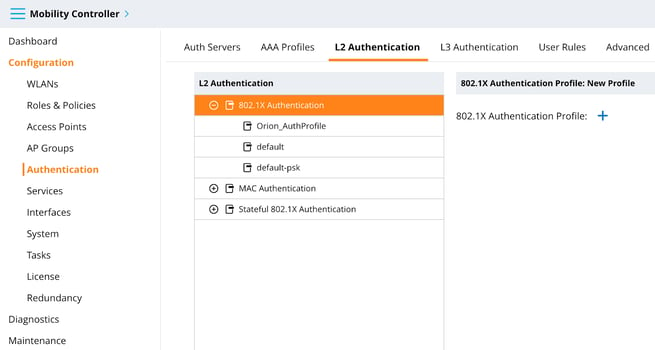
- Click + next to 802.1X Authentication Profile to add the profile. Text boxes appear.
- Complete this information for the 802.1X Authentication Profile.
Profile name—Enter an appropriate profile name, such as “IronWiFi 802.1x Profile” this is to avoid using default profile in the configuration.

6. Click Pending Changes on the top right.

7. Click Deploy Changes to commit the configuration.

The completed 802.1X Profile should look similar to this image.
.png?width=655&height=537&name=35.189.111.2%20(5).png)
Configure the AAA Profile
You create the AAA Profile and then assign (link) the previously defined 802.1X Authentication Profile and RADIUS Authentication Server Group to the AAA Profile.
Create the AAA Profile
- Select Configuration and then Authentication from the menu on the left side of the Aruba Dashboard.
- Select the AAA Profiles tab on the top middle of the dashboard..
On the right side of the page, an area appears where you’ll define the profile. - Click + next to AAA Profile to add the profile. Text boxes appear.
- Complete this information for the AAA Profile.
Profile name—Enter an appropriate profile name, such as “IronWiFi AAA Profile”.
RADIUS Interim Accounting—Click the checkbox.
RADIUS Acct-Session-Id In Access-Request—Click the checkbox. - Click Submit on the bottom right. This saves and loads the configuration.
- Click Pending Changes on the top right.
The Pending Changes dialog box appears.
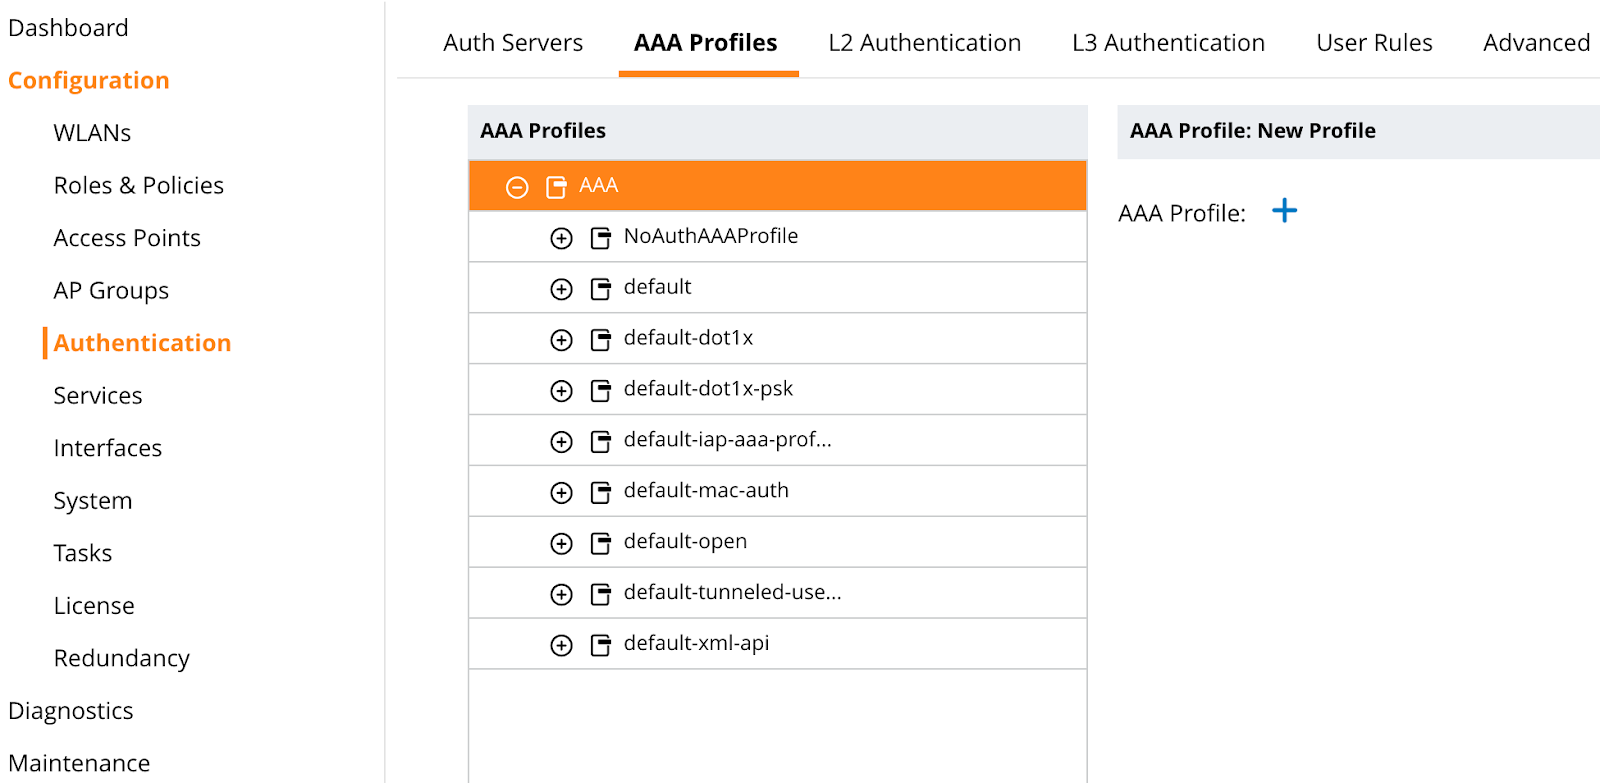
The completed AAA Profile should look similar to this image.
-1.png?width=655&height=428&name=35.189.111.2%20(6)-1.png)
Assign the 802.1X Authentication Profile and Server Group to the AAA Profile
- From the Aruba Dashboard, select Configuration > Authentication > AAA Profiles > AAA.
- Select 802.1X Authentication under the AAA Profile you defined. The 802.1X Authentication Profile: IronWiFi 802.1x Profile information box appears.
- Select the 802.1X Authentication Profile you defined.
.png?width=655&height=198&name=35.189.111.2%20(7).png)
- Click Submit on the bottom right. This saves and loads the configuration.
- Select 802.1X Authentication Server Group under the AAA Profile you defined. The Server Group: IronWiFi_dot1_aut information box appears.
- Select the RADIUS Authentication Server Group you defined.
.png?width=651&height=354&name=35.189.111.2%20(8).png)
Note: With redundant servers, we recommend selecting Fail Through so that only the primary server is active. This avoids asymmetric routing issues. - Click Submit on the bottom right. This saves and loads the configuration.
- Select RADIUS Accounting Server Group under the AAA Profile you defined. The Server Group: IronWiFi Radius Group information box appears.
- Select the RADIUS Authentication Server Group you defined.
.png?width=653&height=246&name=35.189.111.2%20(9).png)
- Click Submit on the bottom right. This saves and loads the configuration.
- Click Pending Changes on the top right. The Pending Changes dialog box appears.
- Click Deploy Changes to commit the configuration.
Configure the wireless LAN
To configure the wireless LAN, you create an SSID profile and then configure the wireless LAN with the RADIUS Authentication servers.
Create the SSID Profile
We recommend creating a new SSID to avoid impacting any existing SSID configurations running in production.
- Select Configuration and then System from the menu on the left side of the Aruba Dashboard.
- Select the Profiles tab on the top right of the dashboard. A list of all profiles appears.
- Select Wireless LAN from the Profiles list.
- Under Wireless LAN, select SSID. On the right side of the page, an area appears where you’ll define the profile.
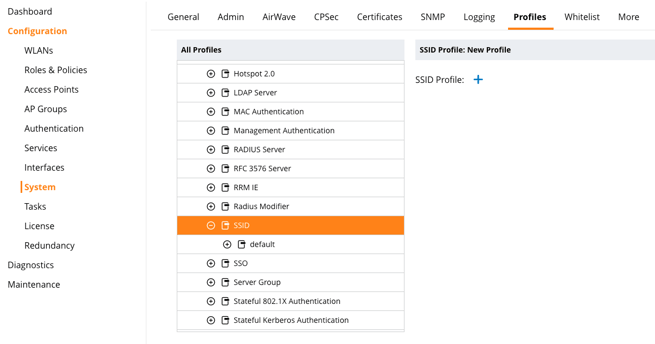
- Click + next to SSID Profile to add the profile. Text boxes appear.
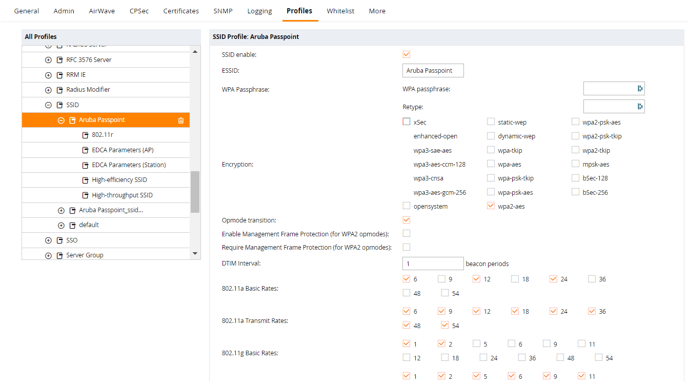
- Complete this information for the SSID Profile. Each SSID you create will use the properties (such as encryption, channel, ESSID and WPA type) you define in the SSID profile.
Profile name—Enter an appropriate profile name, such as “Aruba Passpoint”.
ESSID—Enter a string value, cannot be left blank.
WPA Passphrase—Check wpa2-aes.
8. Click Pending Changes on the top right.
The Pending Changes dialog box appears.
The completed SSID Profile should look similar to this image.
Create and configure the wireless LAN
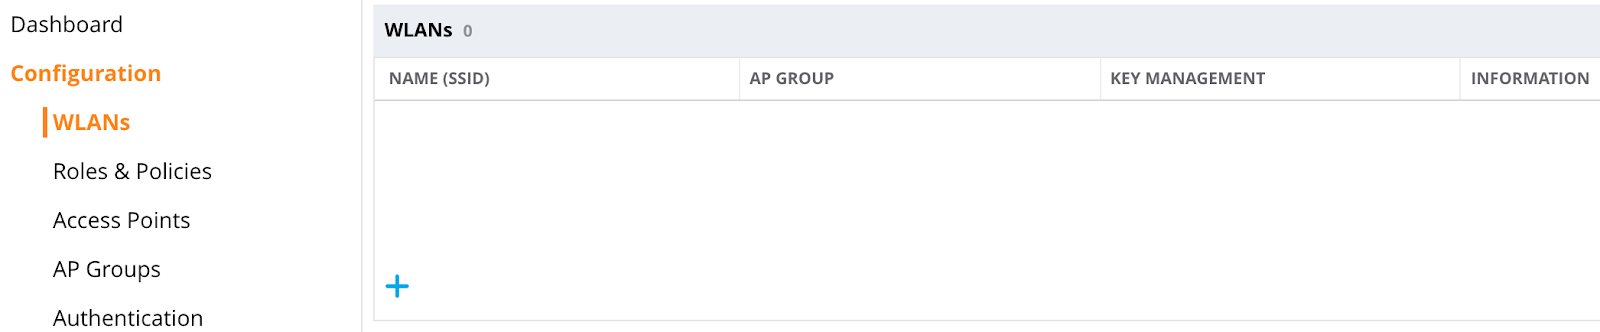
- Select Configuration and then WLANs from the menu on the left side of the Aruba Dashboard.
A WLANs information box appears. - Click + at the bottom left of the WLANs information box. You see properties to define for the wireless LAN.
- Complete General properties for the wireless LAN.
Name (SSID)—For example, enter “Aruba Passpoint”. Enter a name that people who are trying to connect to the network will see.
Primary usage—Select Employee (default value)
Broadcast on—Select All APs (default value) or a group of access points.
Forwarding mode—Select the appropriate forwarding mode for your network. - Click Next on the bottom right.
- Complete VLANs properties for the wireless LAN per your network requirements.
- Click Next on the bottom right.
- Complete Security properties for the wireless LAN. Select Enterprise and configure its options.
Key management—Select WPA2-Enterprise.
Reauth interval—Enter an appropriate interval (default is 1440 minutes). - Add the RADIUS Authentication servers to the wireless LAN by clicking + in the bottom left of the Auth servers information box.
- Select each RADIUS Authentication server and click OK on the bottom right to add it.
- Click Next on the bottom right.
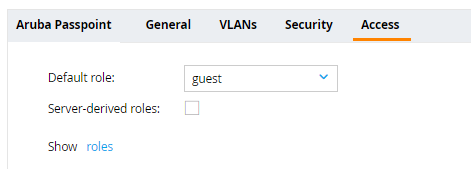
- In the Access properties, select the appropriate Default role for clients who join the wireless LAN.
- Click Finish on the bottom right to save the wireless LAN.
- Click Submit on the bottom right. This saves and loads the configuration.
- Click Pending Changes on the top right.
The Pending Changes dialog box appears.


Configure a virtual access point
You assign the configuration profiles you’ve defined to a virtual access point (AP).
Create the Virtual AP Profile
- Select Configuration and then System from the menu on the left side of the Aruba Dashboard.
- Select the Profiles tab on the top right of the dashboard. A list of all profiles appears.

- Select Wireless LAN from the Profiles list.
- Under Wireless LAN, select Virtual AP. On the right side of the page, an area appears where you’ll define the profile.
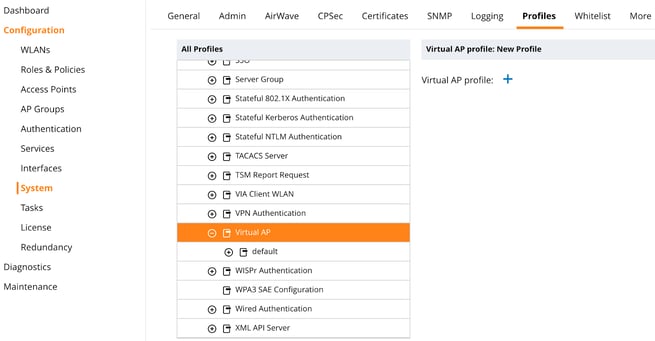
- Click + next to Virtual AP: New Profile to add the profile. Text boxes appear.
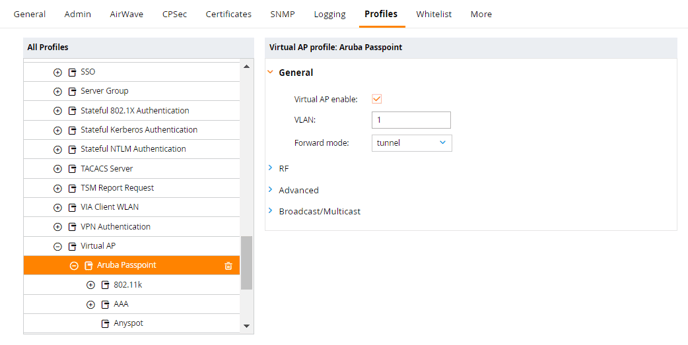
- Complete this information for the Virtual AP Profile.
Profile name—Enter an appropriate profile name, such as “Aruba Passpoint”.
Forward mode—Select bridge (the selection might be different depending on your existing network settings). - Click Submit on the bottom right. This saves and loads the configuration.
- Click Pending Changes on the top right.
The Pending Changes dialog box appears.
The completed Virtual AP Profile should look similar to this image.
Assign all profiles to the Virtual AP Profile
- From the Aruba Dashboard, select Configuration > System > Profiles > Wireless LAN > Virtual AP.
- Select AAA under the Virtual AP you defined. The AAA Profile: IronWiFi AAA Profile information box appears.
- Select the AAA Profile you defined.
.png?width=655&height=282&name=35.189.111.2%20(10).png)
- Click Submit on the bottom right. This saves and loads the configuration.
- Click Pending Changes on the top right. The Pending Changes dialog box appears.
- Click Deploy Changes to commit the configuration.
- Repeat steps 1-6 to assign these profiles to the Virtual AP Profile. You have to submit and deploy changes for each profile.
- Hotspot 2.0
- SSID
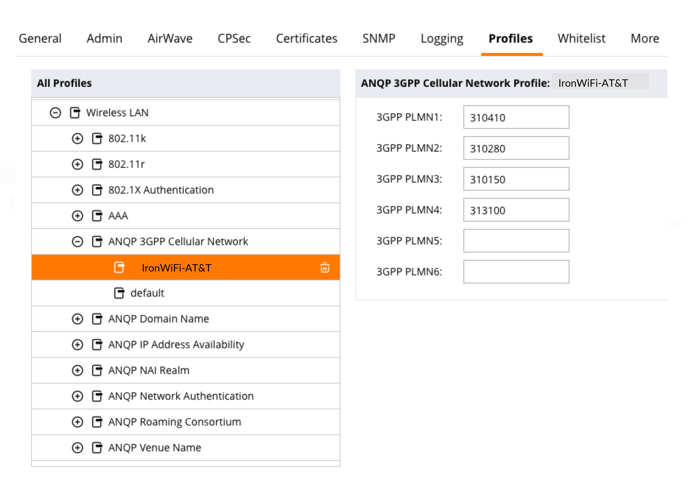
AT&T MNC / MCC Configuration (ANQP 3GPP Cellular Network)
The ANQP 3GPP Cellular Network identifies the cellular network parameters.
1. Select Configuration and then System from the menu on the left side of the Aruba
Dashboard.
2. Select the Profiles tab on the top right of the dashboard. A list of all profiles appears
3. Select Wireless LAN from the Profiles list.
4. Under Wireless LAN, select ANQP 3GPP Cellular Network. On the right side of the
page, an area appears where you’ll define the profile.
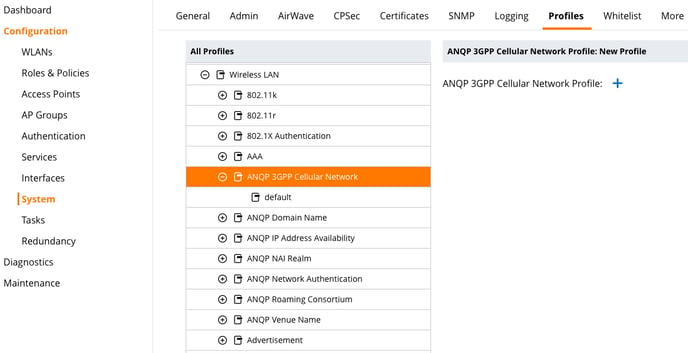
5. Click + next to ANQP 3GPP Cellular Network to add the profile. Text boxes appear.
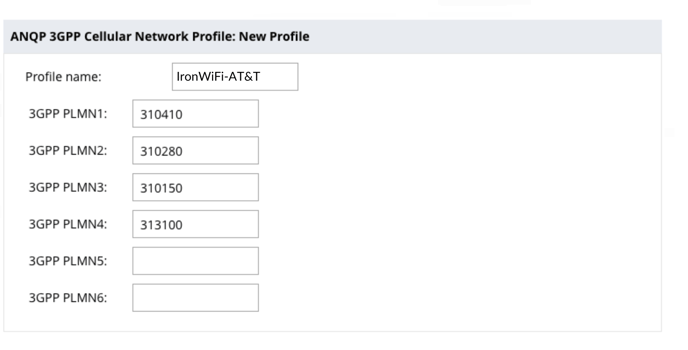
6. Enter the Profile Name and 3GPP PLMN codes into the text boxes, such as
“IronWiFi_AT&T” and PLMN codes as follows.
● 310410
● 310280
● 310150
● 313100
7. Click Pending Changes on the top right.

The Pending Changes dialog box appears.
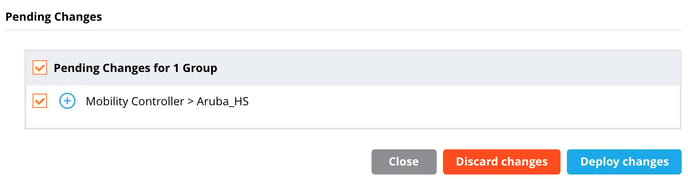
8. Click Deploy Changes to commit the configuration.
The completed profile should look similar to this image.
Note: A completed profile shows a “Submit As” selection next to “Cancel” and
“Submit”. You only use “Submit As” if you’re changing an existing configuration.